


Signal Generator Kit, XR2206 Precise Function Signal Generator Frequency Module DIY Kit Sine Triangle Square Output Adjustable 1Hz-1MHz, 9-12V Direct Current Input(1 Piece)
Details
- BrandWeewooday
- Recommended Uses For ProductEducational
- Voltage3 Volts 12
- Special FeaturePortable
- Included ComponentsSignal DIY kit
- ColorClear


Description
🎛️ Tune into Innovation with Every Wave!
- DIY ENTHUSIASTS DREAM - Perfect for engineers and hobbyists alike!
- UNLEASH YOUR CREATIVITY - Craft custom waveforms with precision and ease.
- HIGH FIDELITY PERFORMANCE - Experience distortion-free signals for accurate results.
- COMPACT TRANSPARENT DESIGN - Show off your work with a sleek, see-through case.
- VERSATILE WAVEFORM GENERATION - Sine, triangle, and square outputs for all your projects.
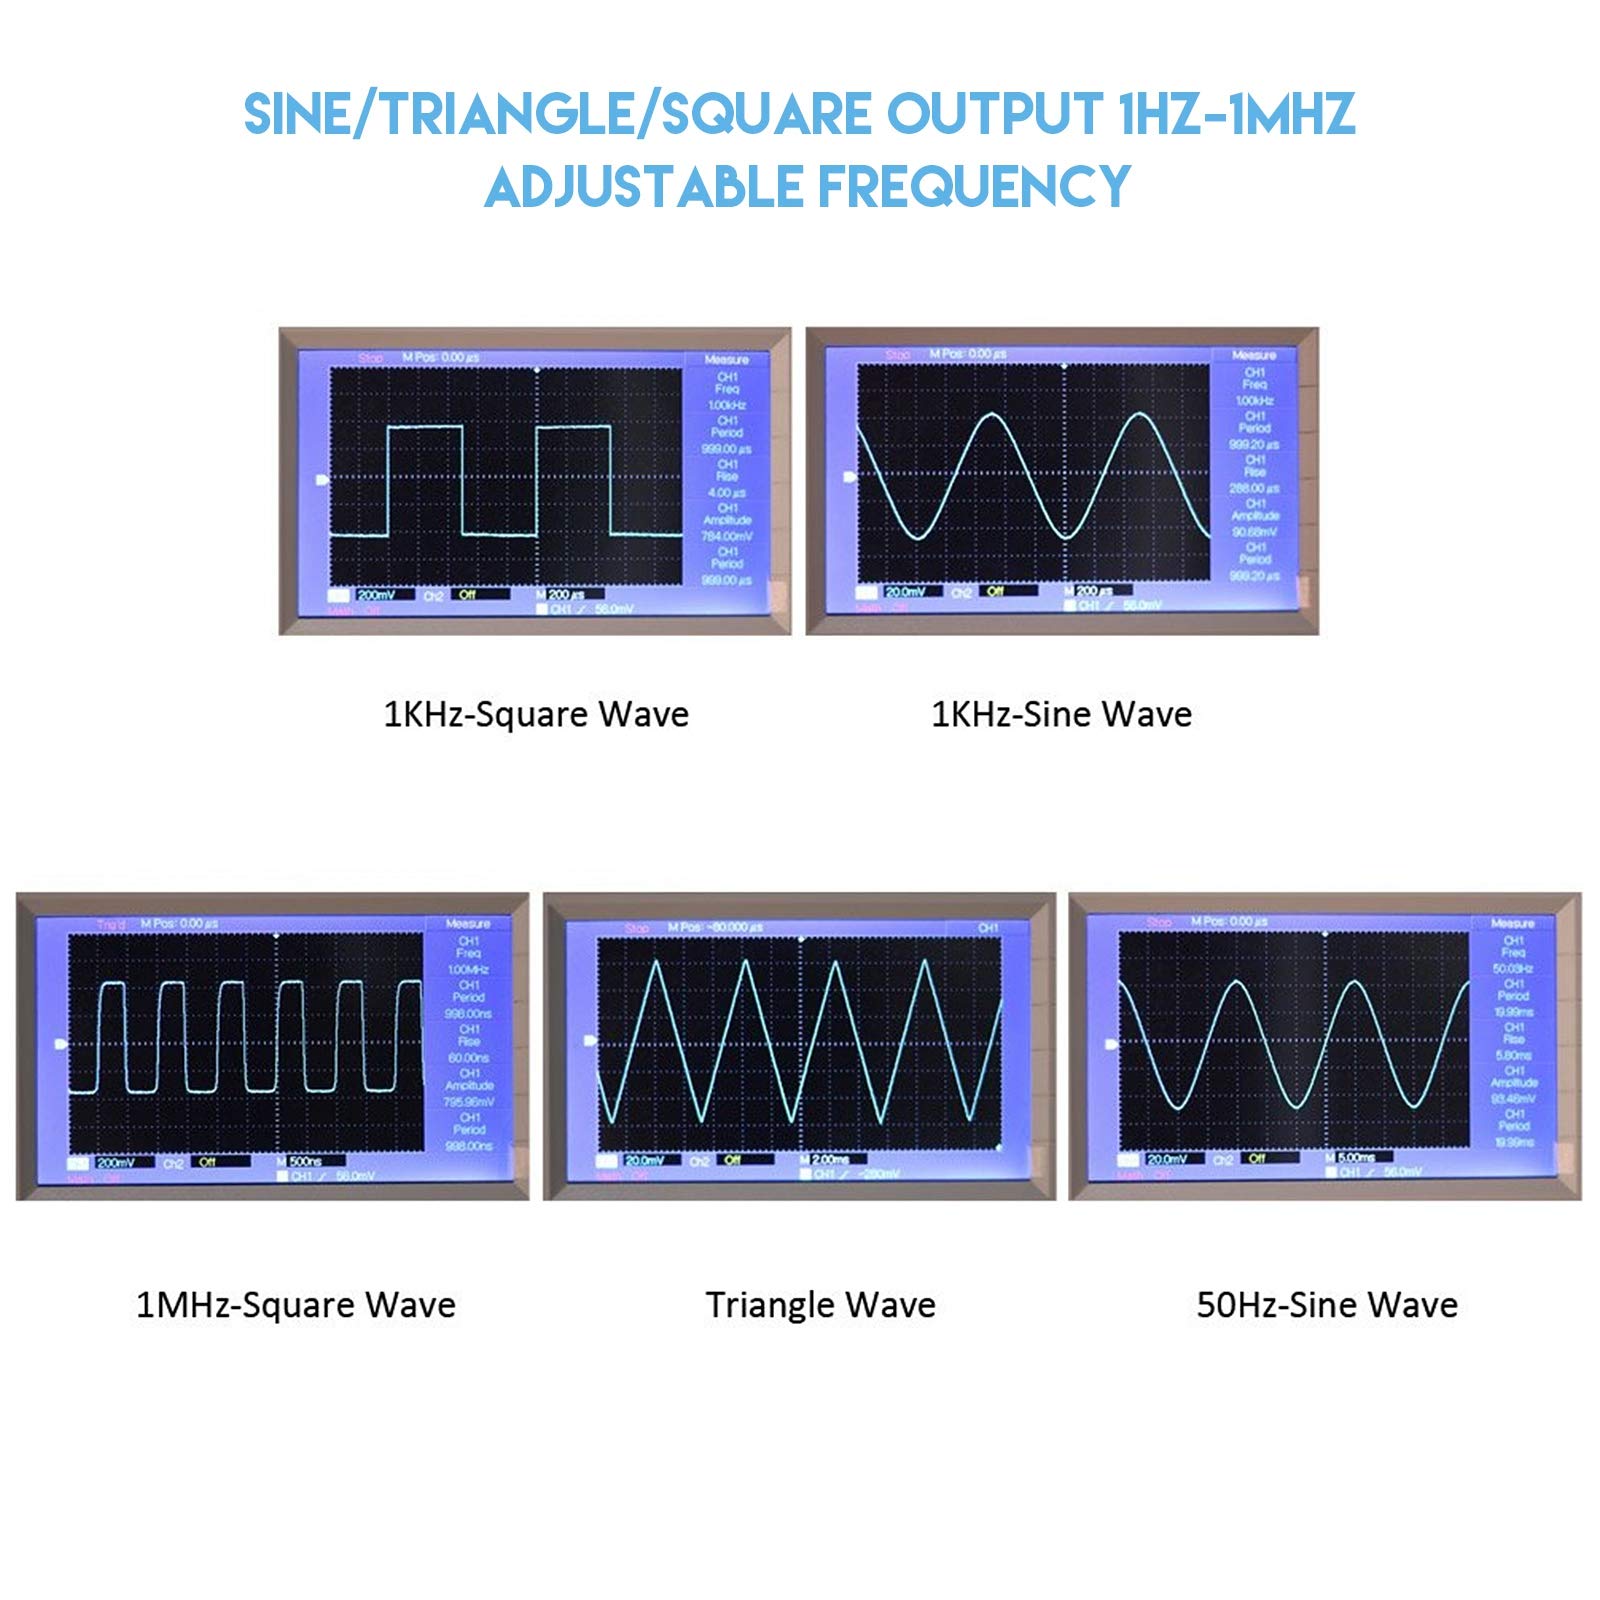
The XR2206 Precise Function Signal Generator Kit is a versatile DIY module that allows users to generate sine, triangle, and square waveforms with exceptional precision. Operating within a frequency range of 1Hz to 1MHz and powered by a 9-12V DC input, this kit is perfect for both professional engineers and hobbyists looking to explore the world of signal generation. With a transparent case for easy assembly and monitoring, it combines functionality with a sleek design.


Have a Question? See What Others Asked
Reviews
S**A
Fine if you have a lower resistor for R4
Beware of the value of R4. That resistance controls the shape of the sine wave. 330 ohms is too high for my chip, so the sine wave was still too triangular. 220 ohms did better. If this is for having a second signal generator for breadboarding, you already have a breadboard, and should find an appropriate value for your chip, before soldering onto the pcb. I also skipped putting C8 in parallel with C7. C7 alone was fine enough for my needs.The value of C1 is depicted as 100uF, but tabulated as 47uF. The kit came with 47uF, and it's just a filtering cap, so it's fine.The XR2206CP itself comes off the pcb, so I can use it on a breadboard for other bands, pulses, ramps, fm, or am, as needed.Still five stars, despite the above caveats, because I have a breadboard, and a 220 ohm resistor to swap. Take away stars as needed if you don't.
R**R
Did not receive the unit pictured in the Amazon listing. Has max frequency of 85 kHz.
The maximum frequency for the unit that was delivered to me is only 85 kHz. (I can measure it with my oscilloscope.) I compared the printed circuit board that I have to the one in the pictures on Amazon. The one pictured on Amazon has five frequency ranges while mine only has four. Maybe the missing one is the higher frequency range? Also, the plastic box seems unfinished. While the box is transparent in the Amazon listing, the one I have is not, and it does not have the labels on it for the frequencies.The function generator chip on this board is the XR-2206. It lets you set the output frequency using external capacitors. The data sheet gives the formula for the output frequency and from the component values in the circuit, the max output frequency will be 85 kHz. So, that is consistent with what I measured. It can go to higher frequencies, so I might replace some of the higher value capacitors with lower valued ones that will result in higher frequency output.The output sine wave has a DC offset of 6V if you supply the circuit with 12 V. I think if you supplied it with +/-12V it would be centered at 0V.I bought this to generate a sine waves from 20 to 40kHz, so it's fine for my purposes. It;s pretty cheap too.
S**Y
Poor quality parts and no QC
I ordered 2 of these and both had issues. One had components with no markings or labels on them at all and the second one had bent pins on two of the chips and a broken piece of the frame. Would not buy again nor recommend to anyone.
B**Z
Nice Kit. Easy build. Good answers to questions.
What a great little box! I bought this to help test an older oscilloscope and to learn on. I asked a question and got an immediate and correct answer. The build took me a couple of hours. I am impressed with the range on the controls. Only caution is it is very small and there are some tight spots where you have to be careful to not get too much solder in there. But take your time and be neat about it and it will all work out. It’s a fairly easy build and a robust design. I will say the triangle wave form looks better than the sine wave, but for my purposes, it’s really good.
J**E
Inexpensive and decent. Good for hobbyists in need of a signal.
If you need a quick signal generator that doesn't have to be spot-on perfect, you can't go wrong for ten bucks. Like others have said, the instructions are a wiring diagram and nothing else. The picture is a bit misleading in that the etching of the ranges for the switches are not in the plexiglass, so write down what you see in the picture.Be careful when installing the potentiometers (knobs). They all look identical, but they aren't. One is not like the others.
B**E
Missing part.
There was a part missing. The ceramic capacitor labeled C6 (473uf) was missing, there was an extra 104 uf capacitor instead. Product doesn't work with a missing capacitor. Before assembly I counted all parts but didn't check for accuracy before I started soldering. Rookie mistake.
A**R
Fun to build, works, cheap signal generator
This is a great cheap little kit considering it includes a case and knobs.Tips:1. Check online for all sorts of tips2. Make sure all parts are soldered tight onto the board since the case holds the board in place by everything just fitting tightly. Example is IC socket as well as variable resistors.3. Two of the tall capacitors fit better if you lay them down on the board or else they can push on the case.4. I needed to just slightly file one of the case tabs so I did not need to force it in.5. If you have not build one of these inexpensive kits and their plexi case. Just be patient and enjoy the process. Example pealing paper of of the plexi does take time but will work.6. The 4 short screws are for alignment and spacing to the case bottom. You may need to slide them a little in their board holes, just loosen and re-tighten them, to get them to align with the holes in the case bottom.7. After soldering you need to trim all the parts such as caps and resistors but ALSO other parts such as the power connector. Put the bottom part of the case on, after inserting the 4 short screws and nuts, to see what all should be trimmed.PROS1. Cheap2. Works fine when built3. You get a nice little case and knobs4. Fun little projectCONS1. No real instructions at all. Just a faded circuit diagram and parts list. The diagram is correct and the circuit board is stenciled well so you can work this out without any help.2. Zero instructions on the case. As mentioned above the 4 small screws are attached to the circuit board via the 4 nuts and are use to align the board to the case and the nuts act as spacers. The long screws hold the case together without nuts, they just screw into holes in the case and work fine as such. Be careful since I same some builds online that skipped the 4 small screws.
Common Questions
Trustpilot
1 week ago
3 weeks ago
